Thursday, July 16, 2009
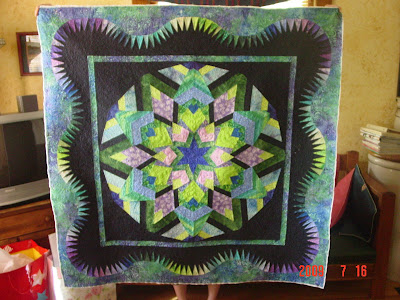
Carol Moellers Kaliedascope
Carol Mollers, a very talented customer of ours designed this quilt, after taking a Ricky Tims workshop in Cedar Rapids called Kaleidoscope Quilts. She will be submitting this for possible publication in Ricky's book on designing Kaleidoscope Quilts. She asked for very dense quilting. It is probably my most challenging project so far.
Sunday, June 14, 2009
June 2009 Meeting at Sue Urich's
This is the top for a start to finish project. A customer wanted her mother's clothes to be incorporated into a quilt for her soon to arrive grandbaby. Michelle designed it.
"The Beat Goes On" created by good Empty Nest Quilters customer Carol Moellers with email consultation from Ricky Tims. Carol had Ricky autograph it at a workshop in Cedar Rapids in May.
Friday, May 22, 2009
Quilt from Heidi Roberson
I just finished a quilt and see that there haven't been any photos posted for awhile to here you go. This client used the 2008 MN Shop Hop fabrics for the main section of the quilt and a maple leaf print for the outside border. The maple leaf was the inspriation so I did a free hand maple leaf pattern and then outline the star blocks and micro stippled in the center of the stars. Love it when a client says "do whatever you want".
Thursday, April 2, 2009
Quilt from Heidi Roberson
This was a fun one to do. The client told me to do whatever I wanted to so I thought I would try a stencil. I started with the washable marker but the was going slow so I changed to chalk which went much faster. A bit messy with the chalk dust but it cleaned off nicely with a light sweep of a paint brush followed by a damp cloth. The gold blocks got the stencil design and then I stitched about a quarter inch off the edge of the black strips.
Thursday, March 19, 2009
March 2009 Meeting
Friday, February 27, 2009
Photo's from Carol and Rich Best
After having our Statler for 4 months we finally were able to put a quilt on it (that was the Log Cabin one shown in the album). Rich quilted an allover design from Anne Bright called "flutterbys" .
Then I got a chance to do a quilt - our first paying customer!! She found the top in the bottom of her closet - it was her Grandmother-in-laws from the 1940's. She 'just wanted it quilted, nothing 'fancy'. Since she was going to hand this down to her kids I asked her if it would be okay if I did something more involved, only charging her for an allover design. She was all for that, thankfully! 25 hours later I finished it -- loving it very much. I used a single design for each of the star wedges. The large squares I used a feather burst pattern. The little squares I used "featherblock 3 half_t", using the rubber stamp to add the mirror image. The border was a lesson by itself! Rich came up with the idea of overlapping the pattern "twilla sash_t", which worked out really well on the top and bottom, the sides proved to be more challenging since the way the Statler figures the side borders only works well if the designs are end to end (at least that was the extent of our knowledge of it - if anyone knows a work around let us know). We created our own work around with alot of measuring and praying. It wasn't exact, but it was close! Since the back of the is quilt was muslin and I used a similar thread the back is basically a whole cloth quilt - it took my breath away - I've never quilted anything so pretty! It was hard to give it back.
Last but not least, is our 2nd customer quilt. She chose "Deb's feathers_t", which stitched out beautifully and was a very welcomed change from the labor intense '40's quilt!
Then I got a chance to do a quilt - our first paying customer!! She found the top in the bottom of her closet - it was her Grandmother-in-laws from the 1940's. She 'just wanted it quilted, nothing 'fancy'. Since she was going to hand this down to her kids I asked her if it would be okay if I did something more involved, only charging her for an allover design. She was all for that, thankfully! 25 hours later I finished it -- loving it very much. I used a single design for each of the star wedges. The large squares I used a feather burst pattern. The little squares I used "featherblock 3 half_t", using the rubber stamp to add the mirror image. The border was a lesson by itself! Rich came up with the idea of overlapping the pattern "twilla sash_t", which worked out really well on the top and bottom, the sides proved to be more challenging since the way the Statler figures the side borders only works well if the designs are end to end (at least that was the extent of our knowledge of it - if anyone knows a work around let us know). We created our own work around with alot of measuring and praying. It wasn't exact, but it was close! Since the back of the is quilt was muslin and I used a similar thread the back is basically a whole cloth quilt - it took my breath away - I've never quilted anything so pretty! It was hard to give it back.
Last but not least, is our 2nd customer quilt. She chose "Deb's feathers_t", which stitched out beautifully and was a very welcomed change from the labor intense '40's quilt!
Monday, February 16, 2009
February 2009 Meeting
Subscribe to:
Posts (Atom)